
After years of promising a Mental Ray tutorial I’m finally getting around to it! Ironically I am doing most of my work with Vray now, but Mental Ray is still a great engine! I think it’s important to learn to push the limits of the tools built into 3DS Max before jumping to 3rd party render engines and plug-ins. Also, though I call this an “Intro” this doesn’t mean this tutorial is specifically for beginners. It can be, but this info is equally useful to seasoned artists. I go step by step so you should be able to produce very similar results, though you can also download my final 4K render and After Effects comp if you just want to skip the scene setup in Max. Anyway it’s a long one, but should be a good time!
We’ll be rendering this cool exterior shot of the always classy ‘81 Delorean. The goal here is to get you creating reasonably “Photo-Real” renders as quickly and simply as possible using only a Plate image (background photo) along with a Spherical HDRI for an IBL (Image Based Lighting) setup. In my opinion this is the first kind of rendering exercise new CG artists should take on. It allows you to focus on the photographic aspects of rendering before worrying about complex light placement, color etc. Also working a CG render into a photographic plate will reveal anything that looks off with your model, exposure and materials. The idea is to make the CG sit nicely into the plate with proper lighting, reflections and shadows. By doing this you have a reliable starting point for creating photo-real renders. So let’s get started!
Resources you’ll need:
HDRIs & Plates, #3 is the one you want. (SMCARS.NET)
Delorean Model (VizPeople.com)
Download My Final Render + Passes and After Effects File
Material Library File for my Delorean Materials
Acquiring the Plate, Spherical HDRI Images and Car
First task is to find a decent plate image and Spherical HDRI to work with. The Plate is your background image and the Spherical HDRI will be used for lighting and reflections. There are numerous places to grab some free Spherical HDRIs, the trick is finding a resource that also provides plate images shot at the same location so there is complete continuity between plate and IBL. For this Tutorial we’ll be using HDRI Pack #3 from the folks at SMCARS.NET I’m not posting files directly here so you will want to go over to their site and download the pack. The plate I’ve chosen is IMG_7375 and we’ll use the full 15K Spherical HDRI seen below.
 Spherical HDRI
The Delorean model can be downloaded from the kind folks at Vizpeople.com
Before getting into Max and setting up our scene we’ll also want to throw the HDRI into Photoshop, hit ALT-I and change the resolution to 5000 Pixels wide. Be sure to Save As rather than overwrite the 15K file. We will use the 5K HDRI for our lighting and the 15K file for Reflections. The reason we make a reduced version for lighting is that more detail in the lighting can create more noise which is undesirable. We likely could reduce it down to even 512×512 and still get decent detail in the lighting.

3DS Max Scene Setup
We’ll be working in Max 2015 here, but the Mental Ray settings will be valid for Max 2014 as well. For pre-2014 you would need to have revealed hidden functionality such as IBL which I won’t be covering here.
Render Settings
- First Things first, let’s hit F10 to bring up the Render Dialog Box.
- Go to the bottom of the Common tab and select NVIDIA Mental Ray as your Production Renderer.
- All my Render Settings are shown in the image below. I will note a couple things though.
- It is vital you change the Frame Buffer Type to 32-bit. By default Mental Ray clips pixel values at 1.0. We want the full pixel range for when we hit comp.
- The Render Elements I have selected are only suggestions. Every render has different needs, but these are the ones I use most.

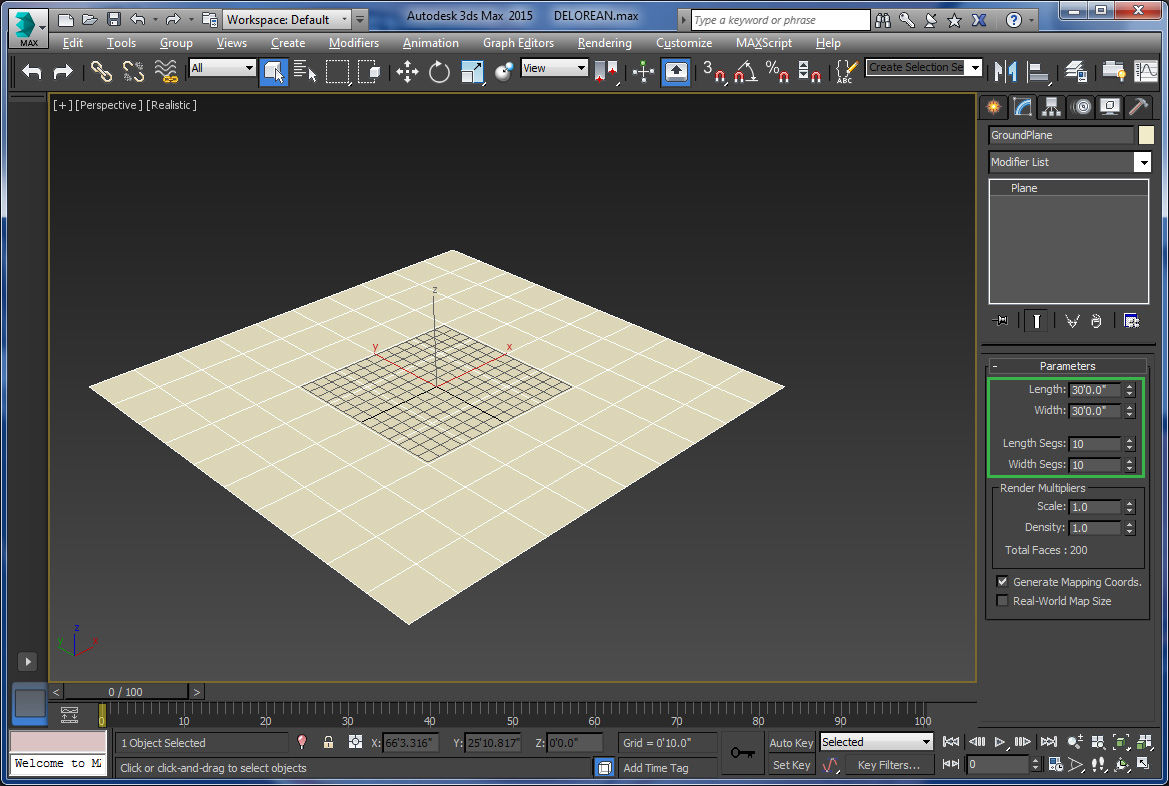
Ground Plane
- Create a Plane at 0,0,0 and make both Length and Width 30 feet. Just big enough to catch our shadows. Set the segments to 10×10. This is to help with our Camera Matching and Mapping later on.
HDRI Light
- Under Standard Lights in the Create Tab select Skylight and place it somewhere near 0,0,0.
- Hit M to bring up the Material Editor (Slate). Import our 5K HDRI image by Right-Clicking, Maps > Standard > Bitmap and browse to and select our HDRI (or just drag and drop from Windows Explorer)
- Be sure to changed the Bitmap Coordinates to Environment > Spherical.
- Now drop this bitmap into the Sky Color slot of the Skylight. This will allow Mental Ray to use the 5K Spherical HDRI as the light source for our Skylight.


Background Plate and Environment Reflection Setup
- In Slate import our selected plate image IMG_7375.jpg.
- Change the Bitmap Coordinates to Environment > Screen.
- We need to setup a special environment map called the Environment/Background Switcher so that our reflection will come from the Spherical HDRI and not the flat plate image. In Slate Right-Click, Maps > Mental Ray > Environment/Background Switcher
- Be sure your plate’s bitmap Coordinates are set to Environ/Screen and your Spherical HDRI bitmap’s is set to Environ/Spherical.
- You can now connect things up to your Environment/Background Switcher. The plate bitmap plugs into the Background Slot and the HDRI plugs into the Enviroment/Reflection slot.

- Now Hit 8 to bring up the Environment Dialog and drop our Environment/Background Switcher into the Environment Map slot.

- We also want to be able to see the plate image in the viewport, so go to your perspective viewport and hit ALT-B to bring up the Viewport Configuration dialog box.
- Check Use Files and browse to IMG_7375.jpg, click OK. Now you can see the plate image in our viewport.

Camera Setup
Obviously our point of view is all wrong for this plate, so we’ll need to setup a camera to reasonably match the angle of the original photo. No magic here. I’d normally use the Perspective Match tool in the Utilities Panel, but it relies on there being numerous parallel and perpendicular elements in your image for matching XYZ Vanishing Points so it’s no good here. Even our road parallels aren’t straight as we are on a curve. So I recommend just doing it by eye.
- In Perspective view using ALT-Middle Mouse Button for Orbit, Mouse Roll Ball for Zoom and Middle Mouse Click for Pan try your best to match up the grid / ground plane to the ground in the photo. Hitting F4 to turn on edges or F3 for Wireframe may help. Remember you just want a rough position, we’ll tweak later once the car is in there.
- Once you have a decent match hit CNTRL-C to create a new Camera in the scene from this precise position. This will also change the viewport from Perspective to Camera001.
- Go to the Modify Panel and change the Lens to 50mm to match the Metadata found on the plate image. Rendering with the same lens type as the plate is always advisable as you are really trying to match focal length as well as position of the original camera. Something like what you see below would be a good starting point.

Initial Test Render
Before bringing the car in I think it’s a good idea to do a little testing and finish setting up the Camera Exposure and Shadow Matte.
- Create a teapot near 0,0,0.
- Set the Segments to 12 and rotate to your liking.

- Now go into slate and Right-Click, Materials > Mental Ray > Arch & Design.
- This will be our “Clay” materials for testing out our lighting, shadows and exposure values. By default it’s diffuse is set to middle gray .5, .5, .5 or in RGB 147, 147, 147. This is just what we want.
- Reduce the Reflectivity to 0. We do this because at this point we want a non-reflective or “Lambert” material to better judge the effects of the HDRI Light.

- Now we will setup our Material Override by hitting F10 to bring up the Render Settings Dialog.
- Go to the Processing Tab Enable Material Override and drag the new Clay material into the Material Override Material Slot. This will cause all objects in the scene to use the Clay material.

- Now Hit F9 to render and lets see what we get.

Pretty amazing right!? Well maybe not, but it does tell us a few things right off the bat.
- Our exposure isn’t quite right, so we will need to do some work there.
- We are getting soft shadows from our HDRI Light which seem consistent with what we’d expect this late in the day so that’s working for us.
- The color temperature of the render is perhaps a little too cool. Well fix that along with exposure in a moment.
Exposure
Ok, I have to preface the next section by saying exposure is sort of a pet peeve of mine. I really don’t like being forced into using nonsensical exposure values. All the major render engines have the ability to use proper camera exposure and when using physically based lighting and shading why wouldn’t you?? Well when it comes to HDRIs there is no standard for pixel intensities so you have to either accept crazy exposure values to make it work or boost the skylight (though that does nothing to correct the reflection intensities), or use some other method to get the pixel values high enough for reasonable exposure values to work. I’ll show you what I mean. Lets go ahead and turn on the mr Photographic Exposure Controls found in the Environment and Effects Dialog (8 key).

These are all default values, but you know, defaults can be good right? Let’s hit Render!
Oh crap, we broke it!! Sort of, we really just have a mismatch in pixel intensities in our HDRI and the exposure values. Our default exposure values are more appropriate for high noon sun on a crystal clear day and our pixel intensities are mostly under 1.0 which makes them very dim for any kind of light source. Now how to correct for this or whether to use exposure at all varies artist to artist and everyone has their reasons for their individual approach. You could boost the exposure of the HDRIs in Photoshop, you could drop the exposure values way down, you could use non-physical exposure and so on. My personal approach involves boosting the pixel values of the HDRIs from within Max combined with adjusting our exposure values to something more like what you would use to capture this image out in the real world. Here’s how we do it.
Let’s go ahead and set our exposure values to something more reasonable. If you’re not familiar with manual camera exposure spend a little time with this great exposure education tool by Canon. Here’s the settings I’m going with.
- I enable Process Background and Environment maps so that our plate and reflections will react to our Exposure settings.
- Shutter Speed 1/30 (this is sort of low for daytime, but it matches video frame rates so it’s still reasonable).
- Aperture 6.0
- ISO 400 (decent exterior ISO for dusk.
- White Balance to 7000 to adjust for the original coolness we were getting.
- Shadows down to 0.0 to keep the low end of the histogram more straight.

So Exposure is setup, but that’s only half the battle. If I were to hit render now, things wouldn’t look much better than our previous test. So now we need to boost those pixel values for the HDRIs and the Plate.
- In Slate Right-Click, Maps > Standard > Output.
- Now set the Output Amount to 500.
- Next Shift-Drag the Output map and make two copies.
- Plug once of these Output Map “Boosters” in between the Plate, 15K HDRI (Reflect) and 5K HDRI (Light).
- For the light boost to take effect you need to select the Skylight and drop the Boost Map for the Light HDRI into the Sky Color slot.

Now let’s hit render (F9) again and see if things have improved.

Yay! It’s fixed! But wait, aren’t we just back sorta where we started before all that exposure stuff? Yeah, sort of, but now can adjust exposures with real world values and get predictable results. Also you can see that our 3D objects are a bit brighter than the initial test and are a bit more accurate to the lighting in the scene. Remember, because we boosted both HDRI maps and Plate our reflections will be naturally balanced as well. You’ll see in a minute. First let’s deal with out big gray ground. We really want that ground plane to only catch shadows, but otherwise be invisible. Here’s how we do that.
Shadow Matte Setup
- In Slate Right-Click, Materials > Mental Ray > Matte/Shadow/Reflection.
- In the Matte/Shadow/Reflect Material uncheck Ambient Occlusion and Receive Indirect Illumination.
- In Slate Right-Click Maps > Standard > Camera Map Per Pixel.
- Now select both the Plate image and it’s corresponding Output Map and Shift Drag them up above the originals.
- Double-Click the newly created Plate Bitmap and change the UV Coordinates to Texture / Explicit Map Channel this way it can accept the Camera Map Coordinates it’s about to receive.
- Plug the new Output Map into the Top Texture slot in the Camera Map
- Now plug the Camera Map into the Camera Map Background slot of the Matte/Shadow/Reflection Material.
- Finally apply this material to the Ground Plane in our viewport, turn off the Material Override in the Processing tab of the Render Settings and apply the clay materials directly to our Teapot.

Now hit Render!

It works! I know that was a lot of node wrangling in Slate, but it was worth it. Now a couple observations:
- Our 30′ x 30′ ground plane may not be big enough to catch the entire shadow.
- Our shadow, though subtle, does have a direction to it and appears to be cast from a strange position considering the remaining sliver of sun is not actually behind the teapot. If we look at the Spherical HDRI it appears to be to the right of camera. We’ll need to rotate our HDRIs for that.
- Our Clay material has been helpful to this point, but we may want to try out a mirror ball type material next to see how reflections are working.
Here’s my analysis of the Plate relative to the HDRI in regards to sun direction etc.

So based on this we need to rotate our HDRI’s to better match the actual position of the camera which shot this plate.
- In Slate Double-Click the HDRIs and change their UV Coordinates U: Value to -.25. I came to this value through trial and error, looking at the shadow direction so it’s at best a reasonable match, but not perfect.
- Also lets create a Chrome material for our Teapot to double check the HDRI rotation through looking at the reflections. Right-Click, Materials > Mental Ray > Arch & Design.
- Change the diffuse to Black, Reflectivity to 1.0, BRDF to “By IOR”, change IOR to 24.0
- Apply the Chrome material to the Teapot
- Hit Render

Ok, now we’re getting somewhere! HDRI Rotation seems to match up pretty well now in terms of both the reflection and the direction of the shadow cast. I think we’re ready to drop in the Delorean!
Working in the Delorean
- Assuming you have already downloaded the Delorean from the good people at VizPeople go ahead and merge in the file VPC_FREE_02.max.
- Since this model is originally setup with Vray materials you will receive an error message, just ignore it, we’ll be replacing all the materials with Metal Ray Archi & Design materials. Also the Delorean will appear Black since Max can’t display the Vray Materials. Here’s how it comes in for me.
 Now I can see that my camera is a little too close as the car measures just over 16 feet long and the typical road lane is somewhere between 8 and 11 feet in Europe (this plate wasn’t shot in Kansas).
- First I’m going to re-position my camera a bit. It’s important to note at this point you want to be careful not to orbit the camera left or right at this point since this will put your HDRIs out of alignment with the plate image.
- Then I move and rotate the car into a more interesting parked position. I suggest Linking the Wheels to the Body before doing so just to make life easier whenever you play with the car position. I have also rotated the front wheels slight to the left just to add some more variation to the “pose”.
Here’s how my new camera and car position look now.

- By the way at this point it’s best to organize your scene into some clear and logically named layers. Here’s my layer setup below.

Before we get into materials let’s turn on our Materials Override under the Processing tab and see how our lighting looks on this classic machine! (Ignore any bitmap warnings at this point)

Ok, looks like all that teapot work paid off. We’re getting some really nice warm Key lighting from the setting sun and cool Fill light from the sky along with decent contact, ambient and subtle key shadowing. Now to tackle the all important automotive materials!
Materials
A few things about materials in Mental Ray. First, I tell anyone who will listen, never ever use the Autodesk Material Library. Not if you’re serious about understanding how to create efficient, high quality materials. The AML materials are just watered down and inconsistent compared to the Arch & Design material. If it’s the provided textures you’re after you can access them directly in the \Program Files\Common Files\Autodesk Shared\Materials\Textures\ folder. There are a ton of useful textures in there, but you are always better off feeding them into an Arch Design Material. Trust me on this. Second, avoid Standard materials entirely! Just because they work with Mental Ray doesn’t mean they are good for use with Mental Ray. Same goes for Vray actually. Get to know the Arch & Design material and you will very rarely need anything else short of SSS and Car Paint materials.
Also, considering the depth of the subject I won’t go into great detail on each material for the Delorean. I’m actually going to do you a solid and simply give you a material library you can load up in Slate and slap on the car. Though this is mostly to save you the hassle of going element by element through the collapsed mesh to figure out what each material is supposed to be. You see, the materials aren’t named so it’s a bit tedious cleaning that up. Good time to say this, ALWAYS NAME YOUR MATERIALS!!! Always! That said, this is a gorgeous FREE model so I only have love for the folks at VizPeople despite their lack of material naming.
Here’s the Material Tree after I’ve renamed and reworked all the materials into Arch & Design mats.

So go ahead and download my Delorean Material Library here.
- To import it into slate click the Material/Map Browser button then click the Material/Map Browser Options button and click Open Material Library.
- Browse to the Delorean Library and open it up.

- Now from the Delorean material library you can drag the Multi-sub named Body to the body of the Delorean and the Multi-sub named Wheels to the wheels.
- Go ahead and hit render. Mine takes about 3 min 32 sec to finish.

Looking good! Now that’s a big cheat jumping right to finished materials, but this tutorial is already a mile long so I’ve gotta cut corners somewhere! Don’t worry, I’ll touch on the Stainless, Glass, Chrome and Black plastic materials. What jumping ahead like this does allow is for us to quickly address a BIG issue specific to the Stainless and our particular HDRI setup. Notice all the noise in the stainless material around our very pretty highlight on the driver side of the car? This is caused by the extreme contrast found in the HDRI, which is after all why we use HDRIs to begin with. Basically the setting sun’s pixel value is so high it’s causing noise issues on materials with low glossies, but very high ref;lectance such as our stainless steal. This is the thing of render nightmares as it is not so easily fixed as you might imagine and can result in lots of cursing and hair pulling. How to fix it? Up the glossiness samples you say (we’re at 64 already)? Sure you could go to 256 and still see almost as much noise. Up the Quality of the Unified Sampler? Yep, you could do that too, but that is overkill via crazy high sampling for the entire image. Now, there is a method by which we can completely fix this noise and actually render just a little faster! It does mean contradicting some of our previous work though. That’s ok, that’s what optimization is all about!
We’re going to utilize Mental Ray’s Environment Blur map. This essentially reduces the input resolution of the HDRI while also doing a pre-blur which is driven by the glossiness value in the Arch & Design material. This will smooth out our noise problem while also optimizing render-time slightly. Now it appears contradictory to take a 15K HDRI and feed it through what is essentially a 2K blur node. To save on ram we could just us the 5K HDRI or create a dedicated 2K HDRI, but I believe keeping the highest level of pixel data right up until the moment of sampling is best whenever possible. Just my opinion though. So here’s how we do this.
- In Slate Right-Click, Maps > Mental Ray > Environment Blur.
- Plug the Env Blur map in between The Output map for the 15K HDRI and the Environment/Reflections slot of the Environment/Background switcher.
- Set the Blur Map Resolution to 2048 (the max) and be sure Derive Blur Amount from Arch&Design Mtl is checked.

Now hit Render and behold.

Like magic the highlight on our stainless is wonderfully smooth! Now let’s get into some of these materials!
Stainless
Here’s our most important material in the scene. I have highlighted the important bits below. Note there is a subtle brushing texture controlling both the Diffuse and Reflection Color. At .5 Glossiness this created pretty blurry reflections which is why we have boosted the samples to 64. Typically I try to stick to 32 and under to avoid longer render-times, but very soft reflections demand high sampling. I also opted for a Custom Reflectivity Function as apposed to going By IOR and boosting the value to say 24 or so. Just a matter of preference. The IOR is likely more accurate, but this looks pretty good too. Metal Material is of course checked and lastly Anisotropy is turned up a bit to .15. I have also set a Material ID of 1 so I can isolate this material in post. In fact many of the materials have IDs on them already so when you render out the Material ID pass you should see a variety of mattes there.

Glass
This is the Glass for both the windshields. The headlamps use a similar glass, but have a bump map for the modeled plastic of the headlamp. Just basic clear and refractive glass which requires a modeled thickness to work correctly. Black Diffuse, Full Reflectivity, IOR of 1.6, Fully Transparent and a slightly blueish Transparency color. Also, though not seen in the image below you will want to go in the Advanced

Black Plastic
This is a basic Semigloss Plastic. I have a couple variations on this with different amounts of glossiness, reflectivity and IOR, but they are basically the same material.

Chrome
A simple chrome. Mostly you see this in the headlamps reflector. Full reflectivity. White Diffuse because Metal is checked. You could have a black diffuse and uncheck Metal, your choice. Using a Custom Reflectivity Function again at .9. For true mirror you could go to .99.

Ok, so you can see the Arch & Design material is very diverse and relatively simple to use, though we’ve only touched on some pretty simple materials. Also notice that aside from the Stainless, Glossy Samples are kept way down around 8. Only boost it higher if you really need to. Go through all the materials in the tree and take a look at what makes them tick. Also the help in 3DS Max has a great section on what each setting does with rendered examples. Now onto creating the composite!!!
Compositing
Wow, almost done! This is a marathon of a tutorial! Sorry about that. I just like to try and explain why I’m doing what I’m doing. That’s the most important part really. Now we get ready to bring our ’81 Delorean into After Effects and do some comp and grade type stuff! But… First… More messing around in slate. Ok, first lets decide something. Are we going to render the car and plate together and treat it as one image or are we going to keep the background and foreground separate? Together is simpler, but I’m going to show you of course the more complex option. We’ll render the car on black to retain a properly multiplied alpha yet still have all our reflections etc along with our Render Elements. After that we head over to After Effects to put it all together.
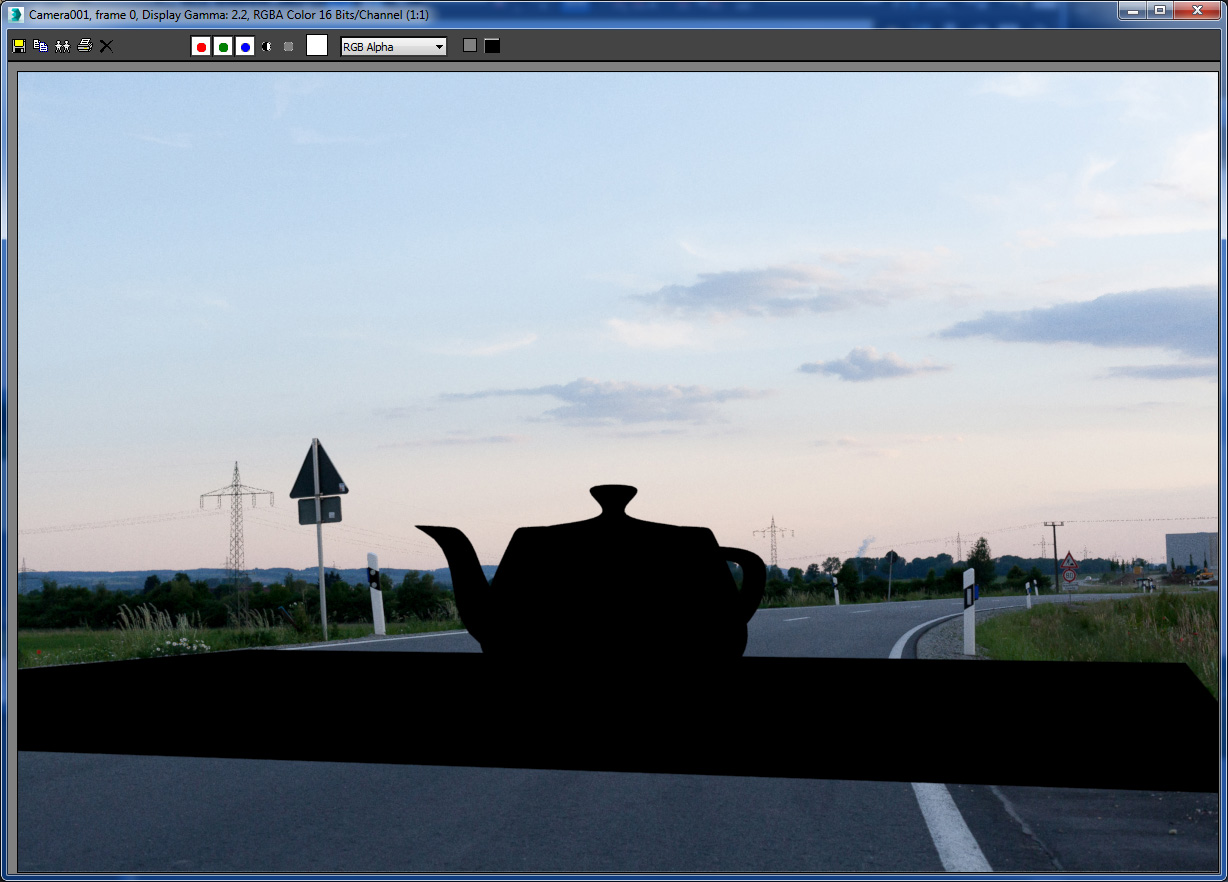
- First Let’s hit the Alpha button at the top of the frame buffer of our last render and see what we get.
 Ouch, not what we want. Then entire ground plane has a solid Alpha. We want just the shadows so that the car will comp nicely ontop of the plate in After Effects. What to do? There are actually no options in the Matte/Shadow/Reflection material to do this unlike Vrays negative alpha setting, so we have to be a little creative. Do the following.
- In Slate Right-Click, Maps > Mental Ray > Color Correction.
- Set the Alpha to ZERO from the Alpha drop down list.
- Right-Click, Maps > Mental Ray > Environment / Background Switcher.
- Plug your Color Correction Map into the Background slot on the Switcher.
- Plug the new Switcher into the Camera Map slot of the Matte/Shadow/Reflections Material.
- Plug the Camera Map for our plate into the Environment slot of the new Switcher.
- Lastly plug the new Switcher into the Background slot of our primary Environment/Background Switcher (the one used that is used in the Environment Map slot for our scene).

- Hit Render.

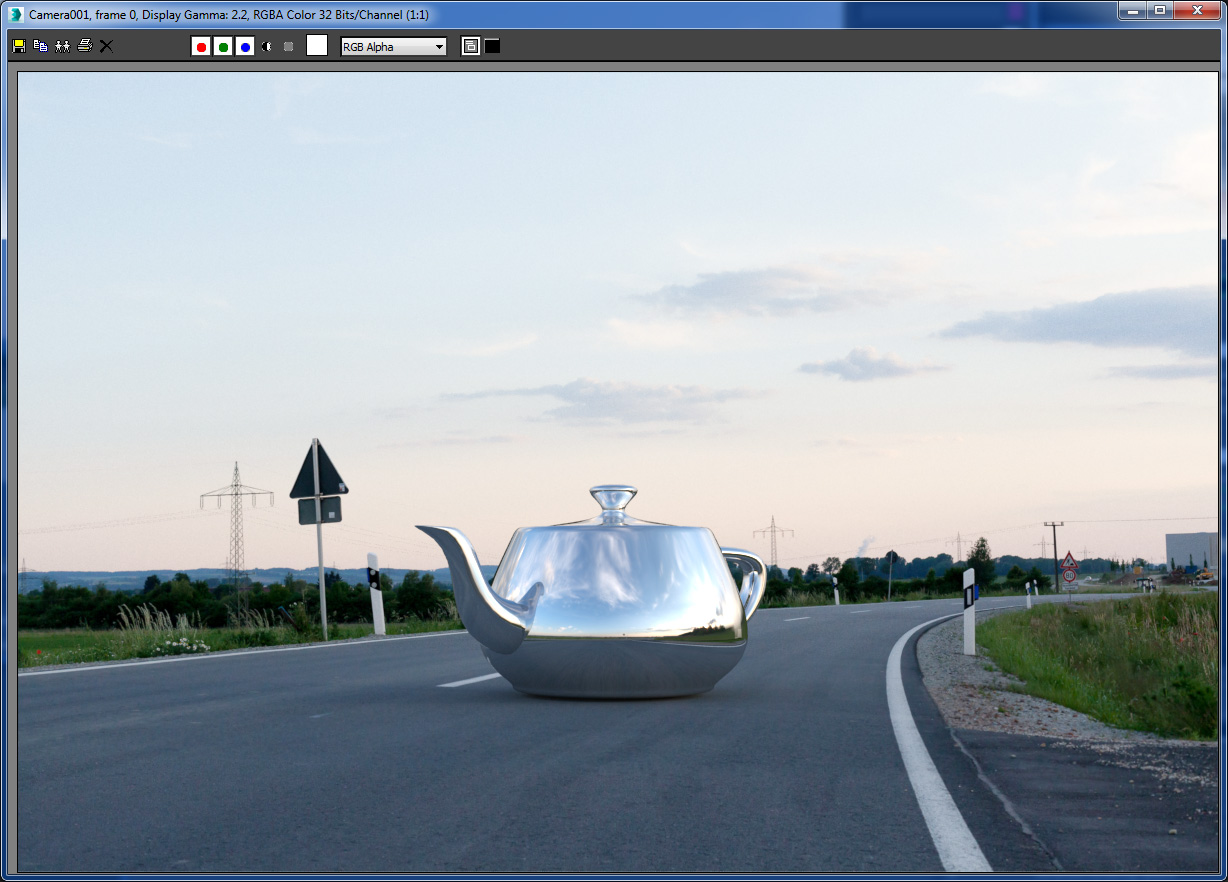
You can see that now only the car remains. I have split the RGB / Alpha display so you can see that only the car and shadows appear in the alpha channel. This is what we need if we’re going to simply drop it on top of the plate in After Effects.
Final Render!
At this point we’re ready to do our final render. So let’s bump the resolution up to 3840 x 2560 (4K at 1.5 aspect ratio). Turn on your desired render elements, select where to save your files being sure to use the OpenEXR format for output. Hit render one last time and go take a walk or get a coffee or something!
You should end up with something like this. Note I’m only using a Reflection, Material ID and Object ID pass. I ditched the Zdepth as I’m not going to be using it in our comp today though it’s usually a good idea to have one.


Now that we have a 4K render you can zoom in and see the fine details of the brushing on the stainless, normal maps on the tires, bump maps on the headlights etc that just weren’t easily seen at the lower resolution. We also have our bunch of passes. Onward!
Compositing in After Effects
This part will be short, I promise!! I’m not going to get into all the subtle effects and grading as I’d rather focus on just a few key points. For the rest I’m providing my AE file and final renders so you can play with it and pick the comp apart yourself. You can also check out my two After Effects grading video tutorials here Part I Part II.Now you might wonder why not do this comp in Photoshop? You could, but as Photoshop is pretty horrible at dealing with 32-Bit files and After Effects is great at it our choice is clear. So let’s go ahead and launch After Effects CC.
- First task is to setup the Project Settings by clicking the Project Settings button at the bottom of the Project Panel.
- Set Depth to 32 bits per channel
- Set Working Space to sRGB 2.1
- Check Linearize Working Space

This setup will allow for any pixel math to be correct where as working in 8-bit creates incorrect pixel values. BTW, this is what they call a Linear Workflow which I suggest making your standard workflow.
- Now import our render, elements and plate image.
- Create a new comp from the “Beauty” shot either by dragging it down to the Comp Button in the Project Panel or Right-Click the render and select Create New Comp From Selection.
- Hit Alt-K and change the Duration to 1 frame.
This is where you should be at.

So the only thing to do now really is drop in our Plate image and adjust it’s scale to match the render output size.
- Drag IMG_7375.jpg into the comp’s Layer Panel below the Render.
- With the Plate’s layer selected hit S and change the scale to 68.38% to accomodate difference between the resolution of our plate and render.
Boom! Just like it looked in Max!

Now it’s time to bring the noise. Yes, we need to add some noise and a hint of blur to our CG stuff as that’s what you find in ALL photos and videos. So we’ll zoom way in on the bumper to take a look at with and without noise. Clearly the CG stuff sticks out as too perfect compared to the plate. The noise / blur help add some imperfection back in. Subtle but important. The settings can be taken from the GIF below. The 2.3% setting is a bit stronger than what we ultimately want, but I wanted the difference to be clear here.

Where one goes from here is completely subjective and I won’t go much further into it here, but let’s just get our feet wet with the Material ID pass and make some tweaks to just the stainless material. In the AE file I provide you can explore a few different comps with different grades setup.
Using Matte Passes (Material ID)
- Drag the Material ID pass in just above the Delorean layer.
- Right-Click in the Effects panel and choose Keying > Linear Color Key
- Select the Key Color Picker and pick the green in the Material ID pass. Now you will see the stainless poking through, but that’s just telling you that the color green is keyed out. In other words Green becomes transparent.

- For the moment hide the Material ID layer.
- Now Cntrl-Alt-Y to create a new Adjustment Layer. This is the layer we will apply our color correction effects to.
- With the new Adjustment Layer selected Right-Click in the Effects panel and select Color Correction > Curves.
- Click on the middle of the line and drag upward to brighten the mid-tones. Currently this will apply to the whole image.
- Now we want to matte this adjustment to only apply to the stainless so position the Material ID layer directly above the new Adjustment Layer and click the Track Matte button to select Alpha Inverted. This will read the alpha of our keyed matte, invert it and apply that alpha to our adjustment layer.
- Now you will see only the Stainless get brighter. You could adjust the Shadows and Highlights etc how ever you light, shift the color channels, apply other effects, whatever you think the Stainless needs.

From here I leave it to you to play around and see how you might change the look of the render. Remember, most any professional car photograph you’ve ever seen went through some sort of post process / grading. Even the reality the camera captures is often only the beginning of the process. Below are 3 examples of different grades one might create side by side with the original render. It’s all a matter of taste. These 3 are pretty tame compared to where you could take it if you wanted a very moody look, or perhaps imply aged film etc or even do a day for night look. These 4 comps are all setup in the AE file you can download here.

This concludes this rather lengthy tutorial introducing photo-realistic rendering with 3DS Max and Mental Ray. Hope it was helpful and know that ultimately all the major render engines today use basically the same techniques so anything learned here is mostly transferable to other engines / 3D Packages. Thanks for hanging in there and go play!